Red Velvet Cupcakes with Cream Cheese Frosting

THEY ARE FINALLY HERE and just in time for Valentine's Day!! The cupcakes are freshly decorated and last time I looked there were only a few left. They won't last long at your place either.

I cannot take credit for the recipe but I have tried many a red velvet cupcake recipe and found the one featured on Joy of Baking to be the best yet. My advice though would be to add 2 tbsp of red food coloring vs just the 1 tbsp as stated in the recipe.

For the icing, I did not use the one shown in the Joy of Baking Red Velvet link. Instead I opted for a basic cream cheese icing I use to frost anything from carrot cake to banana bread.


I snapped a few photos along the way!


Red food coloring being added to the buttermilk


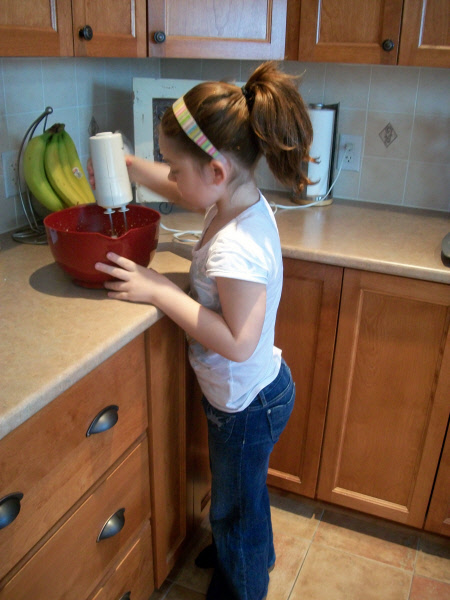
Makes a nice and fluffy batter.
TIP: Make sure you really blend all the ingredients together
well before filling cupcake liners otherwise you will run the risk of a marbled affect
where you will see red cake streaked with cocoa lines.


Fresh out of the oven!


Cooled and ready to be frosted


The final result !


Here is the link to the Joy of Baking Red Velvet Recipe. Icing recipe below.

ICING:

1/2 cup cream cheese at room temperature
1/4 cup unsalted butter at room temperature
1 1/2 cups icing sugar (ensure you sift this to avoid grainy frosting)
1 1/2 teaspoons pure vanilla extract

With hand mixer, whip cream cheese until light and fluffy ( 2 min, medium speed)
Add butter and whip 1 min, medium speed
Add icing sugar and vanilla. Mix until well blended

Fill piping bag with whatever tip you choose and pipe away !

Chocolate Chunk Cookies

Chewy warm goodness fresh from the oven. Forget the chocolate chips. Crank it up a notch and use chocolate chunks instead!

The kids LOVE these and they are nut-free so a safe school snack.


READY, SET, GO !!!

A few key ingredients and 2 ESSENTIAL ones:
Cinnamon and Corn Syrup


A gorgeous cookie batter!


Ready for the oven


PERFECTION!


RECIPE:

WHAT YOU NEED

1 1/2 cups all purpose flour
1/4 teaspoon salt
1 teaspoon baking powder
1/8 teaspoon cinnamon
1/2 cup unsalted butter at room temperature
1/2 cup golden brown sugar (packed)
1/2 cup fine white sugar
1 tablespoon golden corn syrup
1 large egg at room temperature
1 teaspoon pure vanilla extract
1 cup of chocolate chunks (dark or milk are both good choices)

MAKE IT

PREHEAT oven to 375F
LINE 2 cookie sheets with parchment paper
SIFT together flour, salt, baking powder and cinnamon in medium bowl
BLEND butter and sugars with hand-mixer until well combined ( 1 minute on medium speed should suffice)
ADD corn syrup, egg and vanilla to butter/sugar mixture. BLEND until smooth
SLOWLY add flour mixture to butter mixture, scraping down sides when needed
STIR in chocolate chunks

ROLL cookies into 2 inch balls, place on parchment-lined baking sheets and press down slightly with palm of hand. Leave 1 1/2 inch space between cookies
BAKE for 12 minutes

PLACE baking sheet on cooling rack and let sit for 5 minutes
REMOVE cookies from sheet with spatula and allow to cool completely (ok, go ahead and have one!) on a baking rack

BREW A POT OF COFFEE, STEEP A TEA OR POUR A GLASS OF MILK. NOW EAT, EAT, EAT !!

Maple Raisin Tea Biscuit Muffins with Maple Glaze

The taste of a sweet raisin tea biscuit with the consistency of a muffin. Top them with a simple icing sugar/maple extract glaze and you are ready to go !

These are a lovely accompaniment to a pot of earl gray tea. Spread with butter and a dollop of jam.


LET'S GET STARTED !

RECIPE:

WHAT YOU NEED

1 3/4 cup all purpose flour
1 1/2 teaspoons of baking powder
1/4 teaspoon salt
1/4 teaspoon of baking soda
1 large egg (room temperature)
1/2 cup pure maple syrup
1/2 cup milk (full fat or 2% works fine)
1/4 melted unsalted butter
1/2 raisins

GLAZE
1/2 icing sugar (sifted)
1/4 teaspoon maple extract
2 teaspoons milk

MAKE IT

PREHEAT oven to 400F

LINE 12 muffin cups with paper liners

WHISK together first 4 ingredients and set aside
IN SEPARATE BOWL, whisk together egg, syrup, milk and butter

ADD WET ingredients to dry ingredients, stir until combined
STIR in raisins

FILL muffin cups 3/4 full

BAKE 15-18 minutes. Use toothpick in center to check for doneness. If it comes out sticky, back in they go for a little bit longer baking time.

COOL on rack.

MIX all glaze ingredients with whisk until smooth.
DRIZZLE glaze over warm muffins. The glaze will set after a few minutes.


BREW A POT OF TEA, GET OUT THE BUTTER AND JAM.... SIT BACK AND ENJOY !!

Creamy Rice Pudding with Raisins

Ahhhh, another great comfort food. I remember this as being my ultimate favorite when I was a wee one. It was inexpensive and easy to make; my mom's two favorite things !!!

This is a creamy pudding rather than the baked kind. I have never been fond of the latter. A few simple ingredients and you will be greeted by a thick, creamy custard-like pudding with a hint of cinnamon. The raisins are so plump you will want to ensure you snag at least 3-4 with each bite!


Here We Go !!

RECIPE:

WHAT YOU NEED

2 1/2 cups full fat milk. Don't go with anything less than full fat milk !

1/3 cup arborio rice

1/8 teaspoon salt

1/4 cup fine white sugar

1/4 teaspoon ground cinnamon

1 teaspoon PURE vanilla extract

1/4 cup raisins


MAKE IT

COMBINE milk, rice and salt in a saucepan and heat on high until boiling
REDUCE to low/med heat and simmer 25 minutes stirring occasionally to prevent rice from sticking to bottom of pot
REMOVE from heat
ADD sugar and cinnamon, stir until combined
RETURN to stovetop and simmer for 10-15 minutes until thickened, stirring continously
REMOVE from heat, stir in vanilla and raisins

DIVIDE pudding into individual serving dishes (you may be able to get 4 servings out of this. We tend to like larger portions though!). Top with plastic wrap (make sure to press the wrap down so it adheres to top of pudding to prevent a pudding film from developing)

SET serving dishes in fridge to cool until you are ready to DIG IN ! Usually 2 hrs will suffice.

NOTE: I much prefer my pudding at room temperature for that top-notch creamy factor. I leave it out to rest for 1 hr before eating. If you like yours cold just know in advance that it will not be as creamy !

Photo by dreambigphotos featured at Fotolia.com

Chocolate Cupcakes

Decadent chocolate cupcakes LOADED with chocolate chips.... topped with a chocolate buttercream icing. Is there anything better in this world???!!!

I decided to make these on a recent snow day and there were barely any left by day's end!


Featured Guest:
My daughter, Charley !


Let's Get Started


Here is Charley getting ready to whip up a perfect cupcake batter.


As you can see, no fancy equipment needed. Just a hand - mixer will do !


All ready for the oven.

The Result !


RECIPE:

WHAT YOU NEED


1/2 cup cocoa powder (I use Fry's)
1 cup boiling hot water
1 1/3 cups all purpose flour
2 teaspoons baking powder
1/2 teaspoon salt
1/2 cup unsalted butter at room temperature
1 cup fine white sugar
2 large eggs at room temperature
2 teaspoons pure vanilla extract
1 cup chocolate chips (we used milk chocolate chips and they were great!)

FROSTING:
4 ounces unsweetened chocolate (1 square of baking chocolate is 1 oz)
2/3 cup unsalted butter at room temperature
1 1/3 cups sifted icing sugar (do NOT omit sifting!)
1 1/2 teaspoons pure vanilla extract

MAKE IT

PREHEAT oven to 375 F
LINE 12 muffin cups with paper liners
MIX cocoa and hot water together in small bowl. Let stand or place in fridge for faster cooling
IN MEDIUM BOWL, combine flour, baking powder and salt
IN LARGE BOWL, beat butter and sugar with hand-mixer until light and fluffy (1-2 minutes medium speed)
ADD EGGS, mix and scrape down sides during mixing if required
BLEND in vanilla extract
ADD flour mixture and blend until combined
ADD cooled cocoa/water mixture until blended and batter is smooth.
STIR in chocolate chips
FILL muffins cups 3/4 with batter
BAKE 18-20 minutes . Use toothpick in center of muffin to check for doneness
COOL on wire rack (should be ready for frosting in 1/2 hr)

FROSTING:
MELT chocolate over double boiler and let cool
BEAT butter until smooth (1 -2 min) with hand-mixer
ADD icing sugar and mix til combined
ADD vanilla extract and melted chocolate
BEAT 2-3 minutes medium speed

You can either spread icing with cake spatula, regular knife or pipe it for pretty swirls as I did. I used a wilton IM star tip for these.

These make incredibly moist and rich cupcakes. You will be hooked after the first bite!

Luscious Lemon Bars

Who doesn't love lemon bars? They are a family favorite as much in my home as they are in yours!

The light citrus aroma as they bake brings back memories of spring and summer. Given we are now bracing for a massive dump of snow, this is a refreshing change.

These bars have a gorgeous crumbly shortbread crust and a mild lemon topping. Adding flour gives the topping a perfect consistency; no more runny bars !!

Baking powder added to the topping also allows for maximum rise. These come out of the oven filled with tiny little bubble holes on the crust. Perfect for holding that sprinkling of icing sugar :)

Anyway, enough talk! Let's get baking. Pics first, ingredients later.

Here We Go !

Seems all great cooks start with butter so here I am, following in their footsteps! Yes a full cup of butter.... hey, you want a great crust or not?!


Moving along - this is the crust mix, soft, smooth and easy to work with.


I pressed the crust with my fingertips into a well greased
9 X 13 inch baking pan.


This is the topping mix (eggs, sugar, flour, baking powder,
lemon zest and fresh lemon juice).
Tip: use a rasp for zesting. You won't regret it !


The crust is baking away; don't worry if it bubbles up during bake time.
It immediately settles down when removed from the oven.


Pour the topping on the crust right away and return to the oven for
the last 25 minutes of baking time.


The squares are ready - slight browning on top and springs back to the touch.


HERE THEY ARE !!!!!!!!!!!!!!!!

They didn't stick to the bottom of the pan, they have a lovely consistency and
they were not complete without a dusting of icing sugar.


RECIPE:


WHAT YOU NEED

Crust ingredients:
2 cups all-purpose flour
1 cup unsalted butter (melted)
1/2 cup sifted powdered sugar

Lemon filling:
4 large eggs at room temperature (beaten with a whisk til light and fluffy)
1 teaspoon baking powder
1 3/4 cups fine white sugar
zest of 1 large lemon
juice of 1 large lemon (or 2 small lemons - basically enough for 1/2 cup of juice)
4 tablespoons all-purpose flour

MAKE IT

PREHEAT oven to 350F
GREASE 9x13 inch rectangular cake pan
COMBINE crust ingredients and press with fingertips into pan
BAKE for 20 minutes

FILLING: As crust is baking combine all remaining ingredients and whisk together until well combined.

When crust is baked, remove from oven, fill with lemon filling; return to oven
BAKE for an addition 23-25 minutes (don't let the top get overbrown - see pic above for what you are looking for!)

REMOVE from oven and allow to cool for 1/2 hr on a wire rack.

Tip: To remove from baking pan, cut the bars in half and remove each half with a large flexible spatula. Then finish cutting bars into squares

DUST with sifted icing sugar and you are DONE.

Last steps - VERY IMPORTANT: Put on a pot of tea and I will be there shortly ;)

NOTE: If you prefer a tangier bar, I highly recommend pastry chef Anna Olson's Lemon Bars from her Sugar cookbook.


Classic Victoria Sponge

Maybe it is because I am planning a trip to Jolly Olde England; maybe it is the buttercream and jam wedged between two glorious cakes, or maybe it is because this was easy-peasy to make.

Who knows why I decided to make a Classic Victoria Sponge but it is safe to say this: I SURE AM GLAD I DID!


HERE WE GO !

A sponge's best friend (and maybe a girl's too!) -- lotsa butter and a top notch jam ! I bought this gorgeous preserve weeks ago for a perfect day like this - found this gem in an Irish/Scottish import store. Kraft simply won't do!


The beginnings of something beautiful. 2 lovely little sponges waiting to be turned into a buttercream and jam sandwich !!


It didn't have a chance at survival! 2 giant wedges gone
within minutes of it hitting the cake stand!


RECIPE:


WHAT YOU NEED

1 cup fine white sugar
1 cup unsalted butter at room temperature
4 large eggs, beaten lightly
1 cup self-raising flour
1 teaspoon baking powder
2 tablespoons of milk (2% works fine)

ICING AND JAM FILLING:

1/2 cup unsalted butter at room temperature
1 1/4 cups sifted icing sugar
1/4 teaspoon pure vanilla extract
6-12 oz. good quality strawberry jam (I used half a 12 oz jar but feel free to slather the whole thing on there if you want !!)

MAKE IT

PREHEAT oven to 350F.
BUTTER two 8-inch round cake pans
LINE both pans with parchment paper

MIX all cake ingredients in a large bowl until blended. Batter should be smooth.
DIVIDE batter between the two pans and smooth the surface with a spatula.

BAKE for 20 minutes; do the finger test - touch the center and if it springs back it is done. If not give it another minute or two and try again.

COOL cakes on baking racks.
REMOVE cakes from pans once cooled.

NOW to make the filling !!!

COMBINE butter and sugar until smooth. A hand-held mixer works fine.
ADD vanilla extract, blend until combined and set aside. You just made BUTTERCREAM icing!

SPREAD buttercream icing over the bottom of one of the sponges.
SMOOTH jam over the buttercream with a icing knife (or normal knife works fine too!)

SANDWICH second sponge cake on top and it is ready to be eaten !

ENJOY !!!