Heavenly Coconut Seduction Cake

For my birthday I received the gorgeous cookbook Rose's Heavenly Cakes. I have read rave reviews about this book and couldn't wait to test out a recipe. I had my sights set on the Heavenly Coconut Seduction Cake but the problem was that I didn't have a can of cream of coconut. To say finding cream of coconut in Ontario, Canada is challenging would be an understatement. So my cake recipe had to wait but not for long.

My family and I decided to take a jaunt over to the US this past weekend and enjoyed an incredible shopping excursion in Syracuse, NY. I immediately hit up Pottery Barn and Williams Sonoma. I am in love with both stores and definitely plan on being a returning visitor.

While at Williams Sonoma, I decided to ask a clerk where I could find the infamous Cream of Coconut. She swiftly pointed me in the direction of a Wegman's and advised me that Wegman's is simply the best of the best. This store, sent from the heavens it seemed, would have everything and more. As I have never even seen a Wegman's before I thought that perhaps I would be in for a treat. I was. The store was HUGE! It had everything I could imagine including the cream of coconut. Their candy section alone was impressive. I have never seen a grocery store with so many selections before, let alone one that divides M&Ms into the difference colors and loads them up into lovely little dispensers for easy access. My daughter was delirious over the bakery department. She states she has never ever EVER seen so many different types of bagels in her life. Last but not least, they had jars of imported clotted cream which I was desperately seeking to make a clotted cream cake! So Wegman's has won me over. I am a true fan now and cannot wait to return to the US for another tour.

Back to the cake: after successfully locating cream of coconut, I started making this cake within one hour after returning from my trip. It is amazing how one can barely stand up one minute, exhausted to the bone, yet the baking addiction, forever present, quickly rises one up on their feet again and fills them with energy! Only after the cake was baked, cooled, frosted and eaten did I fall into bed and sleep like a baby.

The coconut cake is not a complex recipe at all. It has coconut in the batter as well as sprinkled on top. The cream of coconut adds moisture and flavor. The frosting is nothing more than stabilized whipped cream to which I added a bit of vanilla and a bit of coconut extract. By adding a cornstarch stabilizer blend to the whipped cream you avoid whipped cream separating and it preserves the consistency for 24 hours refrigerated. What I liked just as much was how the stabilizer changed the texture and flavor of the whipped cream to that one a smooth creamy heaven with hints of custard flavor. I could have easily sat back and eaten loads of it by the spoonful it was simply that good.

To get started have a small food processor nearby; one that can accommodate about 1 cup of dry ingredients. Now let's begin!

A must have !


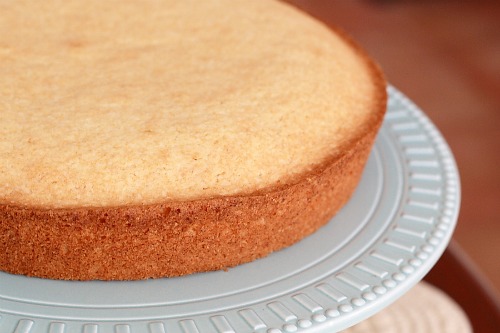
The Heavenly Coconut Seduction Cake baked and ready for frosting!


RECIPE*:
*altered source recipe for Heavenly Coconut Seduction Cake: Rose's Heavenly Cakes

WHAT YOU NEED

CAKE

3 large egg whites at room temperature
2/3 cup creamed coconut (run through the food processor first to combine thoroughly)
3/4 teaspoon pure vanilla extract
3/4 teaspoon coconut extract
1/2 cup minus 1 tablespoon fine granulated sugar
1/2 cup desiccated unsweetened coconut
2 cups cake flour (sifted first into measuring cups and leveled off). I usually simply measure this to ensure accuracy. You are looking for 7 ounces (200 grams) of flour
2 1/4 teaspoons baking powder
1/2 teaspoon salt
1/2 cup (1 stick) unsalted butter at room temperature, cut into small chunks

FROSTING

2 tablespoons powdered sugar
1 teaspoon cornstarch
1 cup heavy whipping cream
1/2 teaspoon pure vanilla extract
1/2 teaspoon coconut extract
sweetened shredded coconut (optional)

MAKE IT

MOVE OVEN RACK to lower third of oven
PREHEAT oven to 350F
GREASE bottom and sides of one 9 inch round cake pan. Line bottom with parchment paper and spray parchment paper with baking spray (a spray with added flour is great too).
IN MEDIUM BOWL, whisk together egg whites, 3 tablespoons cream of coconut, vanilla and coconut extracts. Set aside.
IN FOOD PROCESSOR, pulse together sugar and coconut until you have a fine powder
IN LARGE BOWL (or bowl of stand mixer), mix coconut/sugar mixture, flour, baking powder and salt on low speed for 30 seconds (stand or hand held electric mixtures both work well)
ADD butter and remaining cream of coconut
MIX AT MEDIUM SPEED for 1 1/2 minutes scraping down bowl when required
KEEPING BEATING at medium speed and slowly add egg whites mixture in 2 parts, beating 30 seconds after each addition
POUR batter into prepared pan
SMOOTH surface evenly
BAKE 30-40 minutes or until toothpick inserted in center comes out clean. Mine was perfect at 30 minutes on the dot! NOTE: do not remove until cake starts to pull away from sides of pan.
LET COOL in pan on cooling rack for 10 minutes
REMOVE from pan and allow to cool on cake stand

FROSTING:

IN SMALL SAUCEPAN, over med/low heat, whisk together sugar and cornstarch.
GRADUALLY add 1/4 cup heavy cream
BRING TO LOW BOIL stirring continuously
SIMMER for a few seconds until thickened
SCRAPE mixture into heat proof bowl
LET COOL to room temperature
STIR in vanilla extract

IN LARGE MIXING BOWL (stand mixing bowl if using), BEAT remaining whipped cream until traces of beater marks begin to appear
ADD cooled cornstarch mixture
BEAT until stiff peaks form

FROST top of cake with whipped cream
SPRINKLE with sweetened shredded coconut if desired

ENJOY !


Baked Cake Donuts with Maple Glaze

Super-moist baked donuts topped with a sweet maple glaze and sprinkled with maple sugar. These donuts are cake-like in nature with a lovely crumb. The sour cream in the recipe works wonders for moisture and richness. Only a 1/4 cup of full fat sour cream goes a long way !

The source recipe comes from one of my new fave cookbooks: Doughnuts by Lara Ferroni.

The original recipe calls for yogurt but I used sour cream instead. I also reduced the nutmeg and added cinnamon.

The glaze recipe was also changed by adding some maple extract in addition to maple syrup. It made a world of difference in flavor.

As these are baked donuts, you can save the deep-frying for another day. I piped the batter into the donut molds and they baked up in perfect form. This recipe makes about 8 regular sized donuts or 6 large ones if you want to try and squeeze all the batter into your 6 donut mold pan in one shot.

You will also have leftover glaze with this recipe so either cut the recipe in half or save the excess, covered in the fridge for no longer than 24 hours, and simply give it a quick whisk before using to glaze your next batch!

I readily admit, I ate one still warm and freshly glazed. I didn't give them much time to cool. One one word: Perfection! But they are just as tasty several hours after baking. I do highly recommend eating them the same day they are baked.


LET'S GET STARTED!

RECIPE:
*altered source recipe for Baked Cake: Doughnuts by Lara Ferroni.

WHAT YOU NEED

3/4 cup plus 1 tablespoon all purpose flour
1/4 cup whole wheat pastry flour
1 teaspoon baking powder
1/3 cup superfine granulated sugar
1/4 teaspoon freshly grated nutmeg
1/4 teaspoon Saigon ground cinnamon
1/2 teaspoon salt
2 tablespoons unsalted butter at room temperature or vegetable shortening ( I used vegetable shortening)
1/4 cup whole milk, scalded
1/4 full fat sour cream
1 teaspoon pure vanilla extract
1 egg, beaten

GLAZE

1 1/2 cups confectioners' sugar, sifted
2 tablespoons pure maple syrup
1 teaspoon maple extract
2 tablespoons milk
maple sugar

MAKE IT

PREHEAT oven to 350F
GREASE a 6 mold donut pan with cooking spray

IN LARGE BOWL, sift together flours and baking powder
WHISK in sugar, nutmeg, cinnamon and salt
CUT in butter or shortening with a fork until broken up into pea size
GENTLY FOLD in milk, sour cream, vanilla extract, beaten egg only until combined
SPOON batter into a piping bag equipped with a large french tip (swirl or large circle tips are great too) and pipe into donut pan.
BAKE 6-10 minutes or until toothpick inserted in center comes out clean. Mine were perfect at exactly 8 minutes.

LET COOL in pan 5 minutes
TRANSFER DONUTS to cooling rack.

IN MEDIUM SHALLOW BOWL, whisk together all glaze ingredients except maple sugar
DIP TOPS OF DONUTS into glaze and set back onto rack
SPRINKLE tops with maple sugar
LET glaze to set (approx. 10 minutes)


For those on the hunt for a good donut pan, Amazon has the Wilton one for a super price. I love my Wilton pan! Here is the link: Wilton Donut Pan


In closing, I would like to announce
a new addition to our family.
Her name is Majestic.
She is a glorious butter yellow KitchenAid Artisan Mixer.
I am confident we will soon share an inseparable bond :)


Also seen here:

Button


Victoria Sponge with Berries & Whipped Cream

Last week I celebrated my big 4-0 birthday! And in doing so, I also learned that I have somehow converted into a foodie (baker) snob to a great degree over the past year. When asked about my preferred birthday dessert I had to say nothing store bought. It must be homemade! Nothing else will suffice. No family member wanted to take on the baking challenge so I gladly stepped in.

I wasn't in the mood for your typical birthday cake topped with buttercream and candles. Instead I was craving fluffy whipped cream and fresh fruit layered throughout a light, golden cake. The perfect answer: a Victoria Sponge filled with seedless jam, raspberries, sweetened whipped cream and topped with shaved dark chocolate.

I have a recipe already on Lemon Drop for Victoria Sponge though that one has a frosting in the center. I did stick to the sponge cake recipe in that post but , as you can see, dramatically changed the filling and finishing touches. It was the best birthday cake I have ever eaten!

LET'S GET STARTED

RECIPE
:

WHAT YOU NEED


1 cup fine white sugar
1 cup unsalted butter at room temperature
4 large eggs, beaten lightly
1 cup self-raising flour
1 teaspoon baking powder
2 tablespoons of milk (2% works fine)

JAM, FRUIT and WHIPPED CREAM FILLING:

6-12 oz. good quality, seedless raspberry jam (I used half a 12 oz jar but feel free to slather the whole thing on there if you want !!)
1 pint of fresh raspberries
2 cups whipping cream
1 1/2 teaspoons pure vanilla extract
1 tablespoon fine granulated sugar
1/4 cup shaved dark chocolate

MAKE IT

PREHEAT oven to 350F.
BUTTER two 8-inch round cake pans
LINE both pans with parchment paper

MIX all cake ingredients in a large bowl until blended. Batter should be smooth.
DIVIDE batter between the two pans and smooth the surface with a spatula.

BAKE for 20 minutes; do the finger test - touch the center and if it springs back it is done. If not give it another minute or two and try again.

COOL cakes on baking racks.
REMOVE cakes from pans once cooled.

PLACE one of the cooled cakes on a cake platter
SPREAD with jam
LAYER 3/4 of the raspberries over the jam, reserving rest of raspberries for topping

MAKE THE WHIPPED CREAM
In large bowl, and with your electric mixer, whip together 2 cups of whipping cream (35% fat) with 1 1/2 teaspoons pure vanilla extract and 1 tablespoon of fine granulated sugar. If you want to keep the cake longer than 1 hr at room temperature then add one small packet of Whip It! stabilizer to the cream mix. Whip until soft peaks form.

DIVIDE the whipped cream topping in 1/2 and smooth one 1/2 over the first layer of cake
PLACE second layer of cake on top
SMOOTH remaining whipped cream topping over top of cake
DECORATE with remaining raspberries and shaved chocolate.

ENJOY !!!


Also seen here:

Button


New England Anadama Bread

To keep that bread maker busy here is another fantastic loaf recipe for you to try. This one has molasses and cornmeal for added flavor and texture. Beyond superb toasted with butter and jam.

As written in the cookbook 250 Canadian Best Bread Machine Baking Recipes, this bread was named for Anna, a farmer's wife, who refused to bake for her husband and who ran off with a tradesman. Upon discovering this, it is rumored the farmer was heard whispering "Anna damn her" as he kneaded cornmeal mush, starter, molasses and four for his dinner.

There is a happy ending to the story. Well for us at least. Their marital breakdown brought us this sweet, dense loaf of bread. I intend to send a note of thanks to the tradesman.

Tip: If you don't like a somewhat strong taste of molasses, you can substitute 1 tablespoon of brown sugar for 1 tablespoon of molasses.

LET'S GET STARTED!

RECIPE:
*source recipe: 250 Canadian Best Bread Machine Baking Recipes

Makes 1/5 lb loaf

WHAT YOU NEED

1 1/4 cup water at room temperature
1/4 cup skim milk powder
1 teaspoon salt
3 tablespoons molasses (not blackstrap)
2 tablespoons vegetable shortening or vegetable oil (neutral flavor only)
3 cups bread flour
1/3 cup cornmeal
1 1/4 teaspoon bread machine yeast

MAKE IT

ADD all of the ingredients, in the order as listed, to your bread-maker pan
SET cycle for 1.5 loaf, medium crust
SELECT Basic Cycle and commence cycle
WHEN loaf is baked, remove immediately from pan and allow to cool on rack for 1/2 hr before slicing.

ENJOY!


Golden Pretzel Bites with Fleur de Sel

These scrumptious little pretzel bites are amazing. All golden on the outside and chewy on the inside. What gives them that golden sheen? A simple egg wash right before baking. The best part about these snacks? The dough is made in your bread machine. These are extremely easy to make. No manual labor required other than a little bit of rolling and cutting !

I topped these with Fleur de Sel because a pretzel is not a pretzel without a good salty crunch. You can use a simple coarse sea salt too. It works just as well.

You will need a bread maker of course. Plus a floured work surface, rolling pin and sharp knife for cutting the dough once prepared. Last but not least, a pastry brush is a must for finishing the tops off pre-bake with an egg wash.

Before we begin, I just have to say that using your bread maker to make dough of any kind is fantastic. It does all the work for you including keeping the dough warm while it rises. I am a huge fan of the "Dough" setting and keep it quite busy around here; from whipping up sweet dough for cinnamon buns to creating a gorgeous crust for pizza. Don't underestimate the versatility that little bread maker brings to your kitchen.

Truth to be told, most of us buy bread makers with such great intentions then after one loaf we promptly forget it exists. Shame on us !!! So dust off your bread maker, tell it you are sorry for ignoring it for so long, promise the neglect is OVER and be prepared to be delighted !


Now Let's Get Started !


Here is the dough after I took it out of the bread-maker.
It now needs to rest, covered with a bowl, for 15 minutes.


You don't have to be exact with your cuts. Just aim for 2" bites.


They will start to puff up right away in a 350F oven.
These are ready in 18-20 minutes.


Take them off the hot pan right away or they will keep cooking.
Move to cooling rack. These will be cool enough to eat in 10 minutes.


RECIPE:
*
*source recipe adapted from: 250 Best Canadian Bread Machine Baking Recipes


WHAT YOU NEED

1 1/4 cups water at room temperature
1 1/4 teaspoon salt
2 tablespoons sugar
1 tablespoon shortening
3 1/2 cups bread flour
1 teaspoon bread machine yeast


Topping

1 egg
1 tablespoon water
coarse sea salt or Fleur de Sel


MAKE IT

ADD all ingredients, in the order listed above, to your bread pan
SET bread-maker cycle to DOUGH and commence Dough cycle
WHEN cycle is complete, dust a work surface with flour
PLACE dough onto work surface and cover with a large bowl
LET DOUGH REST 15 minutes
PREHEAT OVEN to 350F
LINE 2 cookie sheets with parchment paper
CUT dough into 4 equal parts
ROLL out each part into a rectangle; no more than 1/2" thick
CUT out 2" squares
PLACE squares on cookie sheets leaving 1/2" gap between each one

IN SMALL BOWL, whisk together egg and water
WITH PASTRY BRUSH, coat the top of each dough square with egg wash
SPRINKLE with coarse salt
BAKE 18-20 minutes until golden brown
REMOVE immediately from cookie sheet and place on cooling rack.


Excellent plain, dipped in ranch dressing, spinach dip or honey-mustard sauce.


Old-Fashioned Sour Cream Donut Drops

Deep-fried donuts! Anything better? Not much. I love donuts. In fact I can safely say it is 3rd on my list of addictions. Thankfully that list ends at #3. First off, my #1 addiction is coffee. If I don't have it to start off the day then let's just say my mug shot could be on the evening news. #2: SALT! Many moons ago when I was just a little girl, my dad bought me a pony. And that little pony was lovely. A furry and brown Morgan horse and by far, the most gentle pet I have ever owned in my life. Anyway, I digress. What I remember most is watching him go crazy with his salt block. He would lick that thing on and off day and night. I couldn't understand why he liked it so much. Fast forward to today - I totally understand. In fact I am considering buying myself one and keeping it under my desk. Thankfully my blood-pressure is low, always has been, so I am safe - for now. But #3 on my list is what brings me here today - DONUTS ! Any kind - fried, baked, yeast-based, old-fashioned, cake style, French crullers, fritters. I will eat them all.

On Lemon Drop I have 2 blog posts now related to donuts: A regular baked version topped with chocolate glaze and a gluten-free baked lemon donut. The fact is I went with baked for both because I am afraid of oil. First, second or third degree burns are simply not what I wish to experience now or in the future. I grew up with a fear (thanks, Mom) of splattering oil. I figured daring to deep-fry donuts would result in a trip to the nearest emergency room so for years I have avoided it. Until today. What changed today? Today I bought a new book called Doughnuts by Lara Ferroni.

A fantastic book! The photos are glorious. The recipes are divine.


Immediately I hit a snag. I didn't have any yeast handy and the majority of the recipes at the beginning of the book are yeast-based. But then I saw the recipe: Old-Fashioned Sour Cream !
No need for yeast and these guys are deep-fried ! So I decided to make them asap. Instead of going for the traditional donut shape I went with little circles instead. Pretty much "donut-holes". I prefer to call them Donut Drops.

Words of caution: be careful not to over-bake. Do not let them cook longer than 2 minutes MAX on one side before flipping. If your dough is 1/2" thick then I say turn them over at 1 minute. Also, keep the oil at 350F. This can be challenging but necessary. Too cool and the donuts will just be greasy sponges. Too hot and they will cook too fast on the outside with uncooked centers.


LET'S GET STARTED
!

You will need an oil/candy thermometer and a deep pot. I used my dutch oven.


Have your biscuit cutter handy. The smallest out of the stack


I let these cool about 5 minutes before spooning 1 teaspoon of glaze over each one.
They would also be lovely topped with sifted powdered sugar.


RECIPE*:
* Recipe adapted from Doughnuts by Lara Ferroni.

This made 22 donut drops for me with a 1 1/2" small biscuit cutter

WHAT YOU NEED

DONUT DROPS

1 1/4 cups all purpose flour
1 teaspoon baking soda
1 teaspoon cinnamon
1/4 teaspoon ground nutmeg ( I like nutmeg in donuts so added this to the recipe)
pinch of salt
1/2 cup superfine sugar
1/4 cup full fat sour cream
1 large egg
1 tablespoon unsalted butter or veggie shortening. I used Crisco shortening
Vegetable oil for frying ( 2 inches deep with 2 inches above the rim of a suitable pot)

VANILLA GLAZE

1 cup icing sugar, sifted
3-4 tablespoon milk
1 teaspoon pure vanilla extract

MAKE IT

IN MEDIUM BOWL, sift together first 5 ingredients
IN LARGE BOWL, combine sugar, sour cream, egg and shortening.
BLEND with a whisk until thoroughly combined
SLOWLY add flour mixture to egg mixture, folding in with a spatula, until thoroughly combined and dough is smooth and uniform in texture
COVER with cling film and put in refrigerator for 15 minutes
HEAT oil to 350F
ROLL out dough onto floured surface to 1/2" thickness
CUT out circles with small biscuit cutter
WORKING with 5 donut drops at a time, place cutouts into hot oil with a heat-proof spatula/skimmer
LET COOK 1 minute, turn over and let cook another minute
PLACE cooked donut drops onto paper towel to drain
MOVE to cooling rack which is placed over a cookie sheet lined with wax paper
CONTINUE cooking donut drops until all dough is used.

MAKE GLAZE:

WHISK together icing sugar, milk and vanilla extract
WITH A TEASPOON, pour glaze over donuts
LET sit 5 minutes until glaze sets
ENJOY !


P.S. Not one burn ! I am 100% burn-free :)


Also seen here:

Button

Chocolate Banana Brownies

Rich, filled with chocolate, moist with bananas and the size of a piece of cake ! These brownies are amazing and shouldn't be missed. Thanks goes to Chef Michael Smith for, yet again, another superb sweet recipe.

These brownies are quite dense and moist due to the addition of 1 cup of butter, 4 bananas and 4 whole eggs. Let's not forget an entire POUND of dark chocolate.

I did adjust the recipe a tad by adding chopped white chocolate to the batter along with 1 teaspoon of pure vanilla extract.

Due to their weighty batter, these babies take a full 1 hour and 15 minutes to bake. And surprisingly, you can get all of this batter nestled nicely into an 8" X 8" baking pan. I usually bake my brownies in a 9" x 13" pan so this was a bit on the scary side for me. I wasn't sure if they were going to rise up properly let alone cook all the way through. Trust in Chef Smith for he is the master! Sure enough, these were PERFECT.


LET'S GET STARTED

RECIPE*:

*source recipe: Banana Brownies


WHAT YOU NEED


1 pound of dark chocolate, chopped
1 cup of unsalted butter
4 eggs
4 ripe bananas (med size preferred)
1 teaspoon pure vanilla extract
1 cup all purpose flour
1 cup granulated sugar
1 tablespoon cocoa powder
1 tablespoon baking powder
4 ounces chopped white baking chocolate

MAKE IT

PREHEAT oven 325F
BUTTER AND FLOUR 8" X 8" square baking pan
In MED saucepan, melt butter and dark chocolate. Set aside
IN LARGE BOWL, mash together eggs, bananas and vanilla extract
WITH WOODEN SPOON, stir in flour, cocoa powder, baking powder
FOLD in melted chocolate/butter
FOLD in chopped white chocolate
POUR into prepared pan
BAKE 1 hr 15 minutes or until toothpick comes out clean & brownies are firm to the touch.


ONE WORD: WOW!


Also seen here:


Button

Lemon Drop Giveaway Winner !!!

To begin, I would like to thank all of you who entered this draw. Your support to Lemon Drop means the world to me.

There was a wonderful turnout for this giveaway. I guess many of us love Paula Deen!

This giveaway, as I am sure you all recall, is for one grand prize. You each had the option of increasing your entry count by adding a sidebar button and/or blog post.


A recap of the grand prize


A Brand New Paula Deen Recipe Card Box


Matching Mug (this is made of hard plastic, not ceramic)


Recipe Cards to fill your new Recipe Card Box


And last but not least, adorable Paper Cupcake Liners!


I again used my preferred online giveaway tool, Random.org, to select the 1 winner!

And the winner is: A Babbling Brunette !

CONGRATULATIONS!
Please email me at lemondropfoodie@yahoo.ca to claim your prize.

For those who didn't win, be prepared for the next giveaway!
I am eager to host another one very soon.
I think June will be a good month, don't you?!

Linda @ Lemon Drop

Old-Fashioned Cinnamon Raisin Bread

A great recipe tailored specifically for use with your trusty bread maker. This bread contains eggs and vegetable shortening which ensures a rich and tender slice each and every time. Speckled with raisins and cinnamon for that taste we all love!

You will be using your Sweet or Fruit cycle on your bread maker for this recipe. This makes a 1.5 lb loaf. Set your machine to normal crust.

About 1/2 hr before beginning, fill up your measuring cup with 1 1/4 cups of water and let sit at room temperature. Yes, no warm water for this recipe. We want perfect room temperature water and then we go from there!

Your egg, on the other hand, should be fresh and straight out of the fridge. No need to bring it to room temperature.

Most bread recipes call for oil as the fatty ingredient. This one calls for shortening. When adding butter or shortening to a bread machine mix, ensure it is always at room temperature and break it apart into small pieces with your fingers before adding to the pan.

This loaf rises up perfectly; no weird lumps and bumps. Also, no pockets of air leaving you with a slice of "more hole" than bread.

So haul out your bread maker and be prepared to salivate as you smell the wonderful aroma of cinnamon fill the air.

LET'S BEGIN!


A truly beautiful loaf


In all its glory!


RECIPE*:
*source: 250 Best Canadian Bread Machine Baking Recipes

WHAT YOU NEED


1 1/4 cups water, room temerature
1 egg
1/4 cup skim milk powder
1 1/4 teaspoon salt
2 tablespoons packed brown sugar
2 tablespoons shortening ( I use Crisco vegetable shortening)
3 1/2 cups white bread flour
1 teaspoon ground cinnamon
3/4 teaspoon bread machine yeast
3/4 raisins


MAKE IT

Add all ingredients above, except raisins, to bread machine pan in the order as written.
Place raisins into "Extra" dispenser . If you don't have one, make sure you add the raisins manually at the "add ingredient" signal.
Select Sweet or Fruit/Nut setting
Select 1/5 lb loaf, regular crust
Select "Add Extras" if you have this feature.
Press Start
Sit back and relax !


A perfect way to start the day


Gluten-Free Creamsicle Cupcakes

With summer fast approaching, memories of orange creamsicles come flooding back to me. They were, by far, my favorite summer treat. That and banana popsicles!

I wanted to make a gluten-free cupcake that would do justice to the classic creamsicle ice cream indulgence. After much research, I settled on a source recipe from The Allergen-Free Baker's Handbook for Orange Chiffon Cake. Then I adapted it quite severely to go from a cake to these fluffy, orange, cream filled delights you see here today.

The chiffon batter does tend to settle after baking so you will have a flat cupcake top. Perfect for what you need to do next and that is cut out the top with a melon baller, fill with creamy vanilla buttercream and then place the cutout cupcake piece back on top.

For the frosting, I took the vanilla buttercream filler frosting and jazzed it up with orange food coloring, orange extract and then piped it all with my Wilton 1M tip. The crowning glory: a little orange gummy candy and an orange candy stick which I simply cut in half as one large one is simply overkill for these beauties.

To begin, you will want to have 1 orange handy and some orange juice (pulp free). I added the scrapings of 1 vanilla bean to the batter plus one in the icing so I highly recommend you have these on hand as well. The vanilla bean enhances the entire cupcake from top to bottom giving it that vanilla flavor so well loved in the creamsicle treat.

This is my staple go-to book for gluten-free baking . I couldn't live without it. As with the Chocolate Cupcake recipe also posted here on Lemon Drop, the original Orange Chiffon one in her book is both vegan and gluten-free. My focus was simply to retain its gluten-free qualities. Therefore, I did used eggs rather than egg replacer.


Basic Gluten-Free Baking Mix
used throughout the book:
  • 4 cups superfine brown rice flour (preferably from Authentic Foods)
  • 1 1/3 cups potato starch (NOT potato flour)
  • 2/3 cup tapioca flour or tapioca starch
You will need 3 cups of this baking mix blend for this cupcake recipe.


NOW LET'S GET STARTED!

RECIPE:


WHAT YOU NEED


CUPCAKES
2 cups fine granulated sugar
1 egg
1 cup orange juice (pulp free)
zest of one medium orange
scrapings of 1 vanilla bean
1 teaspoon pure vanilla extract
3 tablespoons canola oil (Crisco oil is great)
3 cups gluten-free flour mix (see above)
3/4 teaspoon xanthum gum
4 teaspoons baking powder
1/2 teaspoon salt
orange food coloring gel or liquid food coloring

FILLING/FROSTING
2 1/2 cups unsalted butter at room temperature
6 cups icing sugar, sifted
scraping of one 1 vanilla bean
3/4 cup whipping cream

FROSTING EXTRAS:
1 1/2 teaspoons orange extract
orange food coloring gel
orange gummy candies
orange candy sticks, cut in half

MAKE IT

LINE muffin pans (2) with 16 liners.
PREHEAT oven to 350F

IN LARGE BOWL, with electric mixer, blend together sugar and egg for 1 minute, MED speed
ADD orange juice, zest, vanilla bean scraping, liquid vanilla and oil
BEAT MED speed 1 minute
IN MEDIUM BOWL, whisk together remaining cupcake ingredients
SLOWLY ADD to wet ingredients in 3 batches, mixing slightly after each addition.
BLEND together at MED speed for 1 minute
ADD food coloring and blend into batter on LOW speed just until you have the color you want.
WITH ice cream or cookie scoop, fill liners 3/4 full
BAKE 15-18 minutes testing with a toothpick in center; if it comes out clean then they are done!
LET COOL in pan for 5 minutes
REMOVE and let cupcakes cool on rack completely for 1/2 hr

IN LARGE BOWL, with electric mixer, cream butter for 1 minute MED speed
SLOWLY add icing sugar and continue mixing for 4-5 minutes MED speed
ADD vanilla bean and whipping cream. When adding whipping cream, add only a little at a time until you reach your desired consistency

WITH MELON BALLER, scoop out a circle from each cupcake, approximately 1 inch deep. Set cut out tops aside.
WITH teaspoon, fill cut out areas with 1 teaspoon of white frosting.
COVER with cupcake cutouts
WITH remaining icing, add orange extract. Start adding food coloring: A little goes a long way so start adding a little bit at a time and mix after each addition until desired color is reached.

FILL piping bag with orange frosting and pipe onto cupcakes. I used a Wilton 1M tip for the swirls on top.

TOP with candy and orange stick.

ENJOY !!!


Also Seen Here:


Button