Showing posts with label caramel. Show all posts

Karmel Cake

I like simple cakes. Don't get me wrong, I like layer cakes topped with fluffy buttercream too any day of the week. But sometimes simplicity really works. This is one of those cakes. Now don't let me lead you down the path assuming simple refers to preparation vs presentation because with this cake there is a bit of boiling sugar to deal with at the onset. But from then on out it is smooth sailing. Top a slice of this gorgeous caramel cake with coffee-infused whipped cream and you have an elegant yet humble dessert.

This recipe hails from Rose's Heavenly Cakes - a cookbook that has become a new favorite for me around here and a go-to one when in the mood for cake. It has a vast variety of recipes that range from anything from oil-based cakes to light and delicate genoise. The latter half of the book focuses on smaller cakes (even cupcakes are featured) and finishes off with wedding cakes. Speckled throughout the book are stunning photos and tips that every baker should know and put to good use during their baking adventures.


Named after Rose's friend Karmel, this cake caught my attention because of the caramel flavor infusion created as a result of adding a boiled-down mixture of brown sugar, milk and butter. I adore the idea of homemade caramel sauce and the addition of the sauce to the batter really brings out the sweet flavor I love. The cake itself is not "gooey" in any way, shape or form which is surprising given the caramel addition. I prefer it served still a bit warm from the oven. If you need to store it overnight, wrap it in cling film. Ensure to raise up the wrap on top of the cake with toothpicks though because the top of the cake will start to get tacky as it rests and the cling film will pull off the top crust.

This is a perfect cake for any night of the week or even as a finale to a light lunch. Rose recommends serving it with coffee whipped cream (which I did ) but this is also lovely topped with a scoop of rich and creamy vanilla bean ice cream and a drizzle of your favorite butterscotch sauce.

So without further delay, let's get baking!

RECIPE:
*source recipe: Karmel Cake, Rose's Heavenly Cakes

WHAT YOU NEED

1 cup light brown sugar, preferrably Muscovado
1 1/4 cups milk, divided
2 tablesoons unsalted butter
2 large eggs, at room temperature
1 1/4 teaspoons pure vanilla extract
2 cups cake flour or bleached all-purpose flour, sifted into measuring cup
3 teaspoons baking powder
1/2 teaspoon salt
6 tablespoons unsalted butter

MAKE IT

SPRAY 9" round cake pan with cooking spray and cover base with parchment paper
SPRAY parchment paper with cooking spray (spray with the addition of flour is recommended)
SET oven rack in lower third of oven. Preheat oven to 350 degrees.

CARAMEL SAUCE

HAVE a 2-cup or larger heatproof glass measure, coated with nonstick cooking spray.
IN A MEDIUM SAUCEPAN, with a silicone spatula, stir together the brown sugar, 3/4 cup of milk and the butter.
BRING the mixture to a boil over medium-low heat, stirring constantly.
STOP stirring and boil until an instant-read thermometer registers 238 degrees, the soft ball stage.
TILT the pan to get enough depth for an accurate reading. It will take about 10 minutes or more to reach this stage, and the mixture will look slightly curdled.
WHEN sugar reaches temperature, immediately remove the pan from the heat and pour the mixture into a prepared glass measure to stop the cooking. You should have 1 cup. If less, add cold water to equal 1 cup.
SCRAPE mixture into a medium bowl and gently whisk in the remaining milk. Don't worry if some of the liquid crystallizes on the bottom, it will dissolve during baking.
PLACE the bowl on a wire rack and allow the mixture to cool until is is no longer warm to the touch. It will take about an hour, but to speed cooling, it's fine to set the glass measure in a bowl of ice water. If desired, stir the mixture a few times while cooling in order to equalize the temperature.

MAKE BATTER

IN MEDIUM BOWL, whisk the eggs and vanilla until just lightly combined.
IN BOWL OF STAND MIXER fitted with the flat beater, mix the flour, baking powder and salt on low speed for 30 seconds.
ADD the butter and cooled caramel.
MIX on low speed until the dry ingredients are moistened.
RAISE the speed to medium and beat for 1 1/2 minutes.
SCRAPE down the sides of the bowl.
STARTING on medium-low speed, gradually add the egg mixture in two parts, beating on medium speed for 30 seconds after each addition to incorporate the ingredients and strengthen the structure.
USING a silicone spatula, scrape the batter ito the prepared pan, and smooth surface evenly with a small offset spatula.

BAKE for 25 to 35 minutes or until a wire cake tester inserted in the center comes out clean and the cake springs back when pressed lightly in the center.
THE CAKE should start to shrink from the sides of the pan only after removal from the oven.

SERVE with sweetened whipped cream infused with some instant espresso powder. Or feel free to serve any way your heart desires !


Also seen here:


Sticky Chocolate Cinnamon Buns

Glorious chocolate cinnamon buns! The secret to these decadent treats is the addition of chocolate chips and a layer of caramel sauce lurking underneath as they bake. During the baking process, some of the chocolate chips melt into the caramel sauce. When you flip the buns over after baking you have an incredible chocolate cinnamon bun glazed in a rich and creamy chocolate, caramel sauce.

I started out with my basic sticky bun dough recipe which is made in the bread machine. The cinnamon bun filling ingredients stay the same too but with the addition of 1 1/2 cups of semi-sweet chocolate chips. The biggest change though is the caramel sauce. Made easily in a saucepan and then poured into the baking pan, it serves as the sticky topping to these sweet and delicious buns. For a special dessert treat, top them with whipped cream and a cherry or shaved chocolate. Beyond good!


LET'S GET STARTED

RECIPE:

WHAT YOU NEED

A bread maker with a dough setting
9X13" baking dish

DOUGH INGREDIENTS

1 large egg at room temperature
1 1/4 cups warm water (80F or 27C)
3 1/2 teaspoons oil (plain vegetable oil works best. I used Becel)
1/3 cup granulated white sugar
1 1/2 teaspoons salt
3 1/2 cups white bread flour
2 teaspoons active dry yeast (I use the type marked for bread maker use)

THE FILLING

1/2 cup unsalted melted butter
1/4 cup fine white sugar
1/2 cup dark brown sugar
3 teaspoons ground cinnamon
1 1/2 cups semi-sweet or milk chocolate chips

CARAMEL SAUCE

1/2 cup unsalted butter
1 cup packed dark brown sugar
1 tablespoon corn syrup
2 tablespoons cream or milk

MAKE IT

GREASE baking dish (I melt 2 tablespoons of butter for this and brush it all over the inside of the dish)

IN YOUR BREAD MAKER, ADD all dough ingredients in the exact order as listed above.
SELECT Dough course and press Start

WHILE DOUGH IS RISING, combine all caramel sauce ingredients in a small saucepan
BRING TO A BOIL over medium heat and allow to simmer for 1-2 minutes, stirring continously
POUR INTO prepared baking pan and ensure it covers all areas of the bottom of the pan

ONCE the dough course is complete, liberally sprinkle a work surface with flour
PLACE dough on work surface and roll out to a large rectangle (12" x 16")

Filling Ingredients: BRUSH melted butter on dough leaving 1/2 " edge on all sides
COMBINE sugars and cinnamon together in a bowl, sprinkle all over buttered area
TOP with chocolate chips
STARTING with longest side, ROLL up dough tightly to form a log
WITH SHARP KNIFE, cut rolls in 1 1/2" slices
PLACE rolls in baking dish over caramel sauce
COVER with a clean tea towel and let rise in a warm area for 30 minutes
PREHEAT oven to 350F
REMOVE towel and BAKE in oven for 25 minutes.

ALLOW buns to rest in baking dish at room temperature on cooling rack for 5 minutes
INVERT buns onto a plate

DIG IN !


Also seen here:


Button

Gluten-Free Chocolate Caramel Cupcakes

I cannot get enough of cupcakes! Perfect single serving size treats that are always welcome by all. Though I absolutely love cupcakes made with traditional ingredients such as flour and eggs, I am also thrilled with the fact that it is now so easy to make gluten and egg free ones that taste divine with a wondrous crumb and moistness one doesn't usually expect in an allergy conscious sweet. I remember when I started making gluten-free treats years ago and it was NOT a pleasant experience. Picture a piece of cardboard covered in frosting. Not good. Oh how ingredients and availability have improved !

What is the secret to really tasty gluten-free baked goods? My opinion is the answer lies with the quality of ingredients and this holds true for all types of baking, including those that include gluten, eggs and dairy. Top-notch ingredients are key to success!

I have tried many gluten-free flour mixes and various brands of rice flour, tapioca flour, etc, and yes, I definitely have my preferred faves. I cannot be without Authentic Foods rice flour. It is light and silky in texture and is a must-have for my gluten-free baking. How did I find this flour? By buying Cybele Pascal's cookbook The Allergen-Free Baker's Handbook and taking her recommendations to heart. She swears by Authentic Foods brown rice flour and now I do too! If you have the chance, order some. You can also now order the pre-blended mix as well. If you prefer to use a different brand then absolutely, give it a try. Please be forewarned - I cannot attest to the baking results.

I have shared many recipes on Lemon Drop from Cybele Pascal's cookbook The Allergen-Free Baker's Handbook and here is another one for chocolate cupcakes, which I have altered (her recipe is also dairy free), and to which I added a fudgy caramel frosting.

You would never guess, in a million years, that these are gluten and egg free. The richness is supreme and the frosting adds an amazing sweetness filled with the flavor of creamy and buttery caramel. So let's get started shall we?


Get it ! You won't be disappointed !


Basic Gluten-Free Baking Mix
used throughout the book:
  • 4 cups superfine brown rice flour (preferably from Authentic Foods)
  • 1 1/3 cups potato starch (NOT potato flour)
  • 2/3 cup tapioca flour or tapioca starch
You will need 1 cup of this baking mix blend for this cupcake recipe.
Store the excess in a plastic Ziploc bag. Keep refrigerated.


Absolutely Delicious!


RECIPE:
*altered source recipe for Chocolate Cupcakes, The Allergen-Free Baker's Handbook

MAKE IT

CUPCAKES

1 cup Gluten-Free Flour Mix (see above)
1/2 cup unsweetened cocoa powder
1/4 teaspoon plus 1/8 teaspoon xanthan gum
3/4 teaspoon baking soda
1/2 teaspoon baking powder
1/4 teaspoon Saigon ground cinnamon (regular cinnamon works too but Saigon has such great flavor!)
1/4 teaspoon salt
1 cup buttermilk at room temperature
3/4 cup fine granulated sugar
1/3 cup canola oil
1 1/2 teaspoons pure vanilla extract

FROSTING

1/2 cup unsalted butter ( 1 stick)
1 cup packed dark brown sugar
1/4 teaspoon salt
6 tablespoons heavy cream
3 cups icing sugar, sifted

MAKE IT

PREHEAT oven to 350F
LINE 12 tin muffin pan with paper liners
IN MEDIUM BOWL, whisk together first 7 ingredients
WITH ELECTRIC MIXER, in separate bowl beat together buttermilk, sugar, oil and vanilla for 1 minute on medium speed
SIFT in flour mixture in 3 batches, mixing on low speed 3o seconds after each addition
FILL muffin liners 2/3 full
BAKE in center of oven for 18 minutes or until toothpick inserted in center comes out clean.
LET COOL in pan 5 minutes then transfer cupcakes to cooling rack to cool completely before frosting

FROSTING

IN MED SAUCEPAN, melt butter over med/low heat
WHISK in brown sugar and salt
CONTINUE WHISKING and bring to a boil
BOIL for 2 minutes whisking continuously
REMOVE from heat
WHISK IN heavy cream
RETURN to stovetop and bring again to a boil slowly over med/low heat
IMMEDIATELY remove from heat
STRAIN through a fine mesh sieve into a heatproof bowl or into the bowl of your stand mixer
LET stand at room temperature for 1/2 hr
BEAT in icing sugar in 3 parts, mixing thoroughly after each addition.

FROST as desired. I used a 1M Wilton Swirl tip for these cupcakes.

TOP them off with any candy you prefer or leave plain. I opted for chocolate covered caramel balls.

ENJOY !!!


Also seen here:


Button

Dulce de Leche Brownies

More hugs go out to David Lebovitz for this amazing recipe. The result is a rich and dense brownie with that moist texture that truly makes a brownie shine. In this case, the key ingredient is Dulce de Leche which is mixed into the batter.

Initially I was worried it would make the brownies too "gooey" so I only added it as a middle layer. David's recipe calls for it mixed into the middle and then again on the top. I should trust David for he does know best. The brownies were far from gooey and next time I will definitely add the second layer of that creamy, caramel delight
to the top of them as well.

This is the second recipe I have made from David's book The Sweet Life in Paris. I smiled with glee when I saw it too started out with a melted heavenly blend of chocolate and butter. I believe this was somehow missed in the 10 commandments:

"Thou shall start out all good things with chocolate and butter."


Dulce de Leche


The original recipe can be found on David's site but I have re-posted here as well.

Dulce de Leche Brownies

Makes 12 brownies

8 tablespoons (115g) salted or unsalted butter, cut into pieces
6 ounces (170g) bittersweet or semisweet chocolate, finely chopped
1/4 cup (25g) unsweetened Dutch-process cocoa powder
3 large eggs
1 cup (200g) sugar
1 teaspoon vanilla extract
1 cup (140g) flour
optional: 1 cup (100 g) toasted pecans or walnuts, coarsely chopped
1 cup Dulce de Leche (or Cajeta)

Preheat the oven to 350 degrees (175 C).

Line a 8-inch (20 cm) square pan with a long sheet of aluminum foil that covers the bottom and reaches up the sides. If it doesn’t reach all the way up and over all four sides, cross another sheet of foil over it, making a large cross with edges that overhang the sides. Grease the bottom and sides of the foil with a bit of butter or non-stick spray.

Melt the butter in a medium saucepan. Add the chocolate pieces and stir constantly over very low heat until the chocolate is melted. Remove from heat and whisk in the cocoa powder until smooth. Add in the eggs one at a time, then stir in the sugar, vanilla, then the flour. Mix in the nuts, if using.

Scrape half of the batter into the prepared pan. Here comes the fun part.
Drop one-third of the Dulce de Leche, evenly spaced, over the brownie batter, then drag a knife through to swirl it slightly. Spread the remaining brownie batter over, then drop spoonfuls of the remaining Dulce de Leche in dollops over the top of the brownie batter. Use a knife to swirl the Dulce de Leche slightly.

Bake for 35 to 45 minutes. The brownies are done when the center feels just-slightly firm. Remove from the oven and cool completely.

Storage:These brownies actually become better the second day, and will keep well for up to 3 days.


ENJOY !!!


Dulce de Leche photo: © Danelle Mccollum

Chocolate Chip Butterscotch Muffins

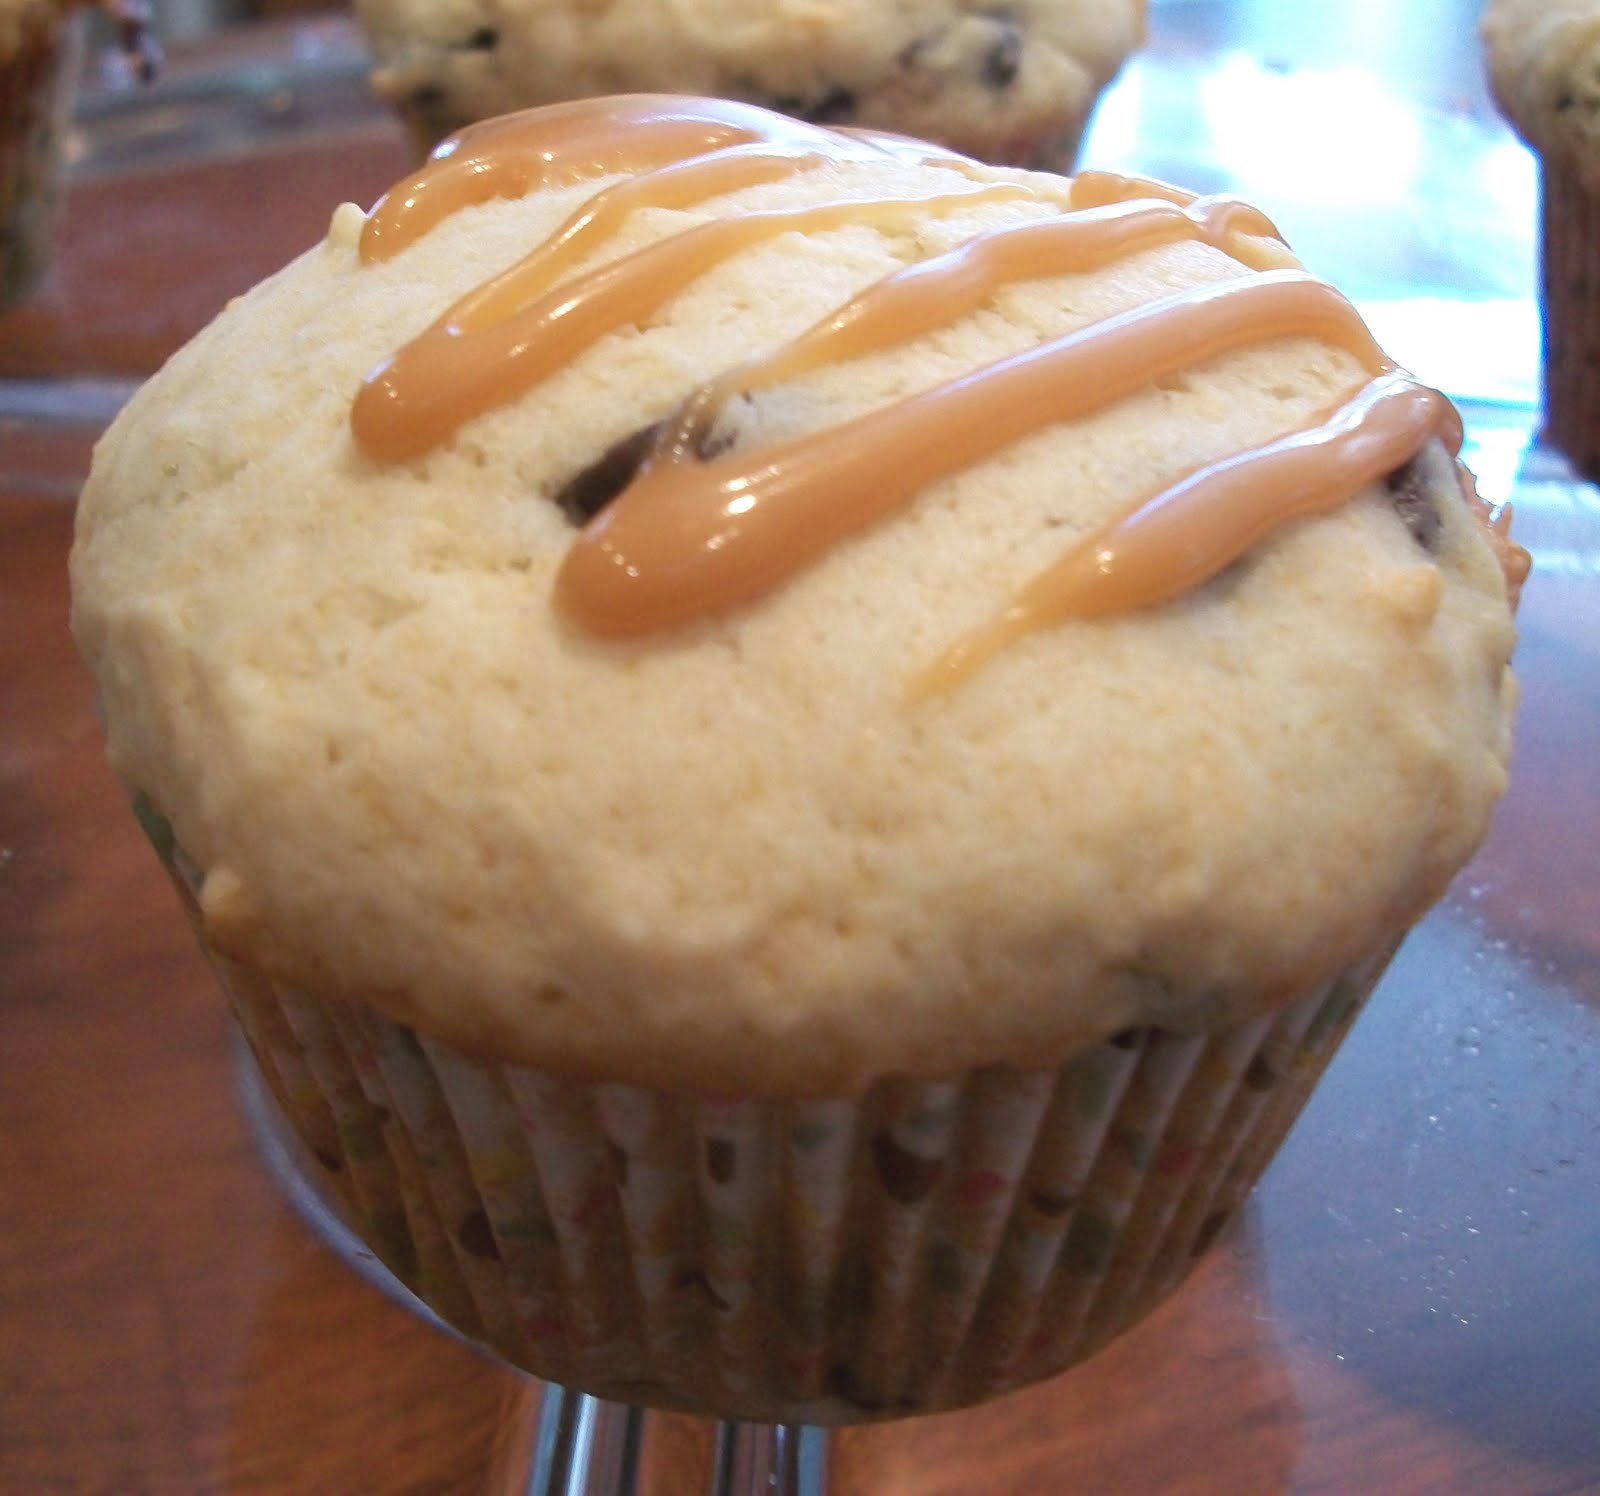
My daughter tried the Tim Horton's chocolate chip caramel muffin last week and announced it was not a hit. So I decided to make my own and see if I could beat the "not a hit" Tim's muffin.

It was an easy peasy challenge to be honest. These were so simple to make and the caramel filling: melted butterscotch chips and 2-3 tablespoons of heavy cream.


LET'S GET STARTED

The muffin recipe is by Williams-Sonoma. The only thing I altered was adding
butterscotch cream to the centers and drizzled over top.

RECIPE as posted by Williams-Sonoma

See bottom of recipe for my adapted version !

Ingredients:

  • 2 1/2 cups all-purpose flour
  • 3 1/2 teaspoons baking powder
  • 1/2 teaspoon salt
  • 12 tablespoons (1 1/2 sticks) unsalted butter, at room temperature
  • 1 cup plus 1 tablespoon sugar
  • 2 eggs, at room temperature
  • 1 1/2 teaspoons vanilla extract
  • 3/4 cup milk
  • 1 cup semisweet chocolate chips


Directions:

Before you start
Preheat an oven to 350°F. Line a 12-cup muffin pan with paper liners.

Mix the batter
In a bowl, using a wooden spoon, stir together the flour, baking powder and salt.

In a large bowl, using an electric mixer, beat the butter and the 1 cup sugar on medium speed until creamy, about 3 minutes. Turn off the mixer and scrape down the bowl with a rubber spatula.

Add 1 egg and beat until blended. Add the other egg and the vanilla and beat until well blended. Turn off the mixer and scrape down the bowl with the rubber spatula.

Add half of the flour mixture and beat on low speed just until blended. Pour in the milk and beat just until blended. Add the rest of the flour and the chocolate chips and beat until blended.

Fill the muffin cups
Using 2 large spoons, one to scoop and one to push, fill each lined muffin cup with batter. Sprinkle the 1 tablespoon sugar evenly over the tops.

Bake the muffins
Put the pan in the oven and bake until the muffins are golden brown and a toothpick inserted into the center of a muffin comes out clean, 21 to 23 minutes.

Remove the pan from the oven, set it on a wire rack and let cool for 20 minutes.

Tip the muffins out of the pan onto the rack and serve warm or at room temperature. Makes 12 muffins.


For My Version: MELT 1 cup of butterscotch chips with 4 tablespoons heavy cream. Fill muffin tins 1/2 way with batter. Add 1 teaspoon of butterscotch cream mixture. Cover with batter to top of muffin liner. When cooled, drizzle each muffin with leftover butterscotch cream.